Posted by The Fabric Fox on 11th Oct 2017
Halloween Fabric Pumpkin Tutorial
Halloween is a great time of year. Who can turn down the novelty sweets, the cheesy horror movies and Stranger Things? It's also the perfect excuse to get creative and to start decorating your home before Christmas!
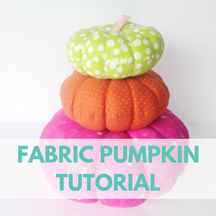
Carving pumpkins is a classic Halloween past-time but what's less messy than carving an actual pumpkin? Sewing a fabric pumpkin! They're super fun and easy to make, and you can make them as large and as colourful as you like - just don't carve into these ones as all the stuffing will fall out.
Here's how you can make your own Halloween fabric pumpkin.

Fabrics used:
Add It Up Folk Dress & Dottie in Caviar
You will need:
2 pieces of fabric (the size of the pieces depends on how large you want your pumpkin to be)
Small rectangle of fabric for the stem (again, the size depends on the size of your pumpkin)
Stuffing (the insides of a cheap pillow is perfect)
Embroidery thread
Sewing machine
Large needle
Pencil
Scissors
Pins
Tip:
If your fabric pieces have creases iron them out first.
Instructions:
1. Place two pieces of your chosen fabric on top of each other and draw around a circle template. I used a dinner plate for mine.
2. Cut out the circle.


3. Place the two pieces right sides together and pin around the edges. Using your sewing machine stitch all the way around the circle, leaving a small gap at the bottom for turning out. (Alternatively, if you don't have a sewing machine this step could be hand stitched).


4. Turn the circle through and fill with stuffing so that it is really well padded. I used the filling from a cheap hollow fibre pillow. Make sure you have stuffing left for the pumpkin stem (step 11).
5. Hand stitch the gap closed.


6. To create the ribs of your pumpkin take a long length of embroidery thread and tie a knot in one end. Using a large needle poke the thread through the middle of your circle, from top to bottom.
7. Bring the thread up and over the side and pull it tight back through the middle of the circle, top to bottom.
8. Repeat this three more times to create four quarter segments.
9. Repeat step 7 until you have 12 equal segments. I did this by creating two more segments inside the four quarter segments.


10. When you have pulled the final thread through to the bottom pull it tight and tie a knot to finish off the pumpkin.
11. To make the stem for your pumpkin take your rectangle of fabric and fold it in half length ways, right sides together.
12. Stitch along the open long end and along one of the short ends, making sure to leave one of the short ends open. Turn the rectangle through and fill with stuffing.


13. Hand stitch the stem closed and hand stitch it to your pumpkin.
Congratulations! Your Halloween fabric pumpkin is finished!

We loved making these so much that we couldn't resist making two non-traditional pumpkins, so we thought we would make them as colourful as possible. We can't wait to see what your pumpkin looks like. Show us a photo on Instagram, Facebook or Twitter.

If you're dying to try more Halloween sewing projects visit our Halloween Pinterest board where you can find even more fun things to make.

